| 일 | 월 | 화 | 수 | 목 | 금 | 토 |
|---|---|---|---|---|---|---|
| 1 | 2 | 3 | 4 | 5 | 6 | 7 |
| 8 | 9 | 10 | 11 | 12 | 13 | 14 |
| 15 | 16 | 17 | 18 | 19 | 20 | 21 |
| 22 | 23 | 24 | 25 | 26 | 27 | 28 |
- grub
- NGC
- docker
- 리눅스 기본명령어
- A100
- 패스워드초기화
- V100
- sysstat
- nvidia-docker
- ifconfig
- uname
- 우분투패스워드초기화
- 도커 설치
- sudoer
- 엔비디아 도커
- 모니터링
- nvidia
- 우분투
- passwd
- Ubuntu 22.04
- ethtool
- 우분투 22.04 패스워드 초기화
- TensorFlow
- Cat
- netplan
- dmesg
- python
- CUDA
- 도커
- TAIL
- Today
- Total
또이리의 Server Engineer
루트 권한 부여하기 리눅스 - root permission 본문
루트 권한 부여하기 리눅스 - root permission
linux root permission 리눅스 사용자 루트 권한 부여하기
지난 스토리에 이어서 이번에는 유저에게 완전히 루트 권한을 부여해 보겠습니다. 그렇게 되면 명령어를 사용할 때마다, 명령어 앞에 sudo를 붙일 필요가 없습니다.
테스트 OS는 ubuntu server 18.04.4입니다.
리눅스 OS에서 이런저런 작업을 하다 보면, 관리자 권한으로 명령어를 실행해야 할 일이 많습니다.
그때마다 sudo + 명령어 형태를 사용하기에는 불편하고 귀찮습니다. 이런 경우에 유저 계정을 아예 처음부터 root 계정의 그룹에 추가하게 되면, 관리자와 같은 권한을 사용할 수 있게 됩니다.
우선 관리자 권한으로 시작해 보겠습니다.
Welcome to Ubuntu 18.04.4 LTS (GNU/Linux 4.15.0-76-generic x86_64)

 * Documentation:  https://help.ubuntu.com
 * Management:     https://landscape.canonical.com
 * Support:        https://ubuntu.com/advantage

  System information as of Sun Nov 22 19:42:32 KST 2020

  System load:  0.64               Processes:            195
  Usage of /:   15.4% of 19.56GB   Users logged in:      0
  Memory usage: 24%                IP address for bond0: 192.168.231.133
  Swap usage:   0%

 * Introducing self-healing high availability clustering for MicroK8s!
   Super simple, hardened and opinionated Kubernetes for production.

     https://microk8s.io/high-availability

174 packages can be updated.
117 updates are security updates.


Last login: Sat Nov 21 15:49:27 2020 from 192.168.231.1
root@ubuntu:~# su - jcil
jcil@ubuntu:~$
명령어 프롬프트가 #으로 시작한다면, 관리자 $로 시작한다면 유저입니다.
위의 코드 블록은 root 계정으로 로그인해서 jcil 일반 유저로 전환을 한 화면입니다.
이제 jcil 계정에 루트 권한을 부여해 보겠습니다.
저는 일반계정으로 전환했으나 관리자 권한으로 진행하셔야 합니다.
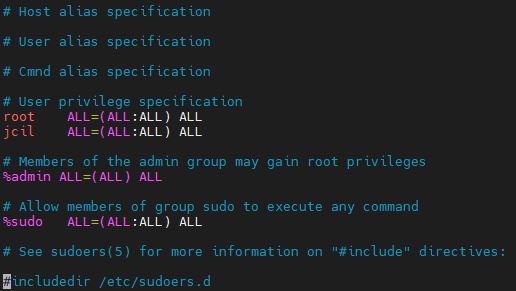
visudo 또는 vim /etc/sudoer를 사용해서 편집해야 합니다. 지난 스토리에서 visudo를 사용해서 편집해 보았으니 이번에는 vim을 사용해서 /etc/sudoer 파일을 편집해 보겠습니다.
# This file MUST be edited with the 'visudo' command as root.
#
# Please consider adding local content in /etc/sudoers.d/ instead of
# directly modifying this file.
#
# See the man page for details on how to write a sudoers file.
#
Defaults        env_reset
Defaults        mail_badpass
Defaults        secure_path="/usr/local/sbin:/usr/local/bin:/usr/sbin:/usr/bin:/sbin:/bin:/snap/bin"

# Host alias specification

# User alias specification

# Cmnd alias specification

# User privilege specification
root    ALL=(ALL:ALL) ALL
jcil    ALL=(ALL:ALL) ALL

# Members of the admin group may gain root privileges
%admin ALL=(ALL) ALL

# Allow members of group sudo to execute any command
%sudo   ALL=(ALL:ALL) ALL

# See sudoers(5) for more information on "#include" directives:

#includedir /etc/sudoers.d
User privilege specification의 root 아래 jcil 유저 계정을 추가해 줍니다.
저장을 하고 나와 주시면 됩니다. rede only 메시지가 발생하면 wq! 를 사용해서 저장하고 나오시면 됩니다.
다음 순서는 /etc/passwd 파일 편집입니다.
vim /etc/passwd를 사용해서 수정해 보겠습니다.
root:x:0:0:root:/root:/bin/bash

user:x:1000:1000:user,,,:/home/user:/bin/bash
jcil:x:1001:1001:,,,:/home/jcil:/bin/bash
jcil2:x:1002:1002:,,,:/home/jcil2:/bin/bash
맨 윗줄의 root 항목이 보이시나요.
앞의 0과 뒤의 0이 있습니다.
앞의 0은 uid(User ID) 뒤의 0은 gid(Group ID)를 의미합니다.
관리자의 uid는 0 gid도 0입니다.
Don't think, just do it.
아랫줄에 일반 유저 계정인 jcil과 jcil2 가 있습니다.
jcil 계정만 uid:gid를 변경해보겠습니다.
root:x:0:0:root:/root:/bin/bash

user:x:1000:1000:user,,,:/home/user:/bin/bash
jcil:x:0:0:,,,:/home/jcil:/bin/bash
jcil2:x:1002:1002:,,,:/home/jcil2:/bin/bash
이렇게 변경하고 저장하신 다음, 빠져나오시면 됩니다.
이제 uid와 gid를 변경했습니다.
마지막으로 root group에 jcil 계정을 포함시켜 주면 됩니다.
이번엔 /etc/group 파일을 수정해 보겠습니다.
vim /etc/group를 사용해서 편집합니다.
root:x:0:

jcil:x:1001:
jcil2:x:1002:
"/etc/group" 57L, 768C
맨 윗줄의 루트 그룹을 확인하시면, 끝에 0을 보실 수 있습니다. 그 뒤에 sudoer와 passwd 파일에서 추가했던 유저의 계정을 추가해 주시면 됩니다.
root@ubuntu:~# vim /etc/group
root:x:0:jcil

jcil:x:1001:
jcil2:x:1002:
-- INSERT --
위와 같이 추가해주시면 됩니다. 저장하시고 빠져나온 뒤 jcil로 로그인합니다.
sudo 명령어 없이, 관리자 권한이 필요한 명령어를 실행해서 확인하시면 됩니다.
root@ubuntu:~# su - jcil2
jcil2@ubuntu:~$ apt-get update
Reading package lists... Done
E: Could not open lock file /var/lib/apt/lists/lock - open (13: Permission denied)
E: Unable to lock directory /var/lib/apt/lists/
W: Problem unlinking the file /var/cache/apt/pkgcache.bin - RemoveCaches (13: Permission denied)
W: Problem unlinking the file /var/cache/apt/srcpkgcache.bin - RemoveCaches (13: Permission denied)
jcil2@ubuntu:~$

root@ubuntu:~# su - jcil
root@ubuntu:~# apt-get update
Hit:1 http://us.archive.ubuntu.com/ubuntu bionic InRelease
Hit:2 http://security.ubuntu.com/ubuntu bionic-security InRelease
Hit:3 http://us.archive.ubuntu.com/ubuntu bionic-updates InRelease
Hit:4 http://us.archive.ubuntu.com/ubuntu bionic-backports InRelease
Reading package lists... Done
root@ubuntu:~#
확인이 되시나요.
일반 유저인 jcil2 계정과 관리자 권한을 얻게 된 jcil 계정의 차이점을 명령어 프롬프트에서도 확인할 수 있습니다.
그리고 jcil계정은 명령어 프롬프트의 시작이 jcil이 아닌, root로 시작하게 됩니다.

'Linux Engineer' 카테고리의 다른 글
| 리눅스 ls 명령어 - 기본 명령어 (0) | 2020.12.09 |
|---|---|
| 우분투 패스워드 초기화 ubuntu passwd reset (5) | 2020.11.25 |
| sudo 권한 부여하기, 리눅스 su su - 차이 (0) | 2020.11.21 |
| apt-get 과 apt 차이점 (0) | 2020.11.20 |
| 리눅스 top 명령어 (0) | 2020.11.19 |


