
| 일 | 월 | 화 | 수 | 목 | 금 | 토 |
|---|---|---|---|---|---|---|
| 1 | 2 | 3 | 4 | 5 | 6 | |
| 7 | 8 | 9 | 10 | 11 | 12 | 13 |
| 14 | 15 | 16 | 17 | 18 | 19 | 20 |
| 21 | 22 | 23 | 24 | 25 | 26 | 27 |
| 28 | 29 | 30 |
- 패스워드초기화
- TensorFlow
- 모니터링
- netplan
- A100
- passwd
- sysstat
- 도커
- CUDA
- 우분투패스워드초기화
- nvidia-docker
- nvidia
- 엔비디아 도커
- V100
- Ubuntu 22.04
- dmesg
- sudoer
- ethtool
- ifconfig
- Cat
- 리눅스 기본명령어
- 우분투 22.04 패스워드 초기화
- 우분투
- grub
- NGC
- 도커 설치
- uname
- TAIL
- python
- docker
- Today
- Total
또이리의 Server Engineer
netplan bonding 우분투 본딩 본문
netplan bonding 우분투 본딩
ubuntu18.04 bonding netplan
이번 스토리는 우분투에서 netplan을 사용해서 본딩을 진행하겠습니다.
ifenslave와 ethtool설치
우선 bonding를 구성 및 설정하기 위해서는 ifenslave와 ethtool 패키지가 필요합니다.(저는 root 권한으로 테스트 진행합니다.)
여러분은 sudo 명령어를 사용하시거나 root 권한으로 진행하시면 됩니다.
root@ubuntu:~# apt-get install ifenslave
Reading package lists... Done
Building dependency tree
Reading state information... Done
The following NEW packages will be installed:
  ifenslave
0 upgraded, 1 newly installed, 0 to remove and 171 not upgraded.
Need to get 13.3 kB of archives.
After this operation, 49.2 kB of additional disk space will be used.
Get:1 http://us.archive.ubuntu.com/ubuntu bionic/main amd64 ifenslave all 2.9ubuntu1 [
Fetched 13.3 kB in 1s (15.2 kB/s)
Selecting previously unselected package ifenslave.
(Reading database ... 67041 files and directories currently installed.)
Preparing to unpack .../ifenslave_2.9ubuntu1_all.deb ...
Unpacking ifenslave (2.9ubuntu1) ...
Setting up ifenslave (2.9ubuntu1) ...
Processing triggers for man-db (2.8.3-2ubuntu0.1) ...
root@ubuntu:~#
root@ubuntu:~# apt-get install ethtool
Reading package lists... Done
Building dependency tree
Reading state information... Done
ethtool is already the newest version (1:4.15-0ubuntu1).
0 upgraded, 0 newly installed, 0 to remove and 171 not upgraded.
root@ubuntu:~#
현재 OS에는 ethtool 설치되어있음을 확인할 수 있습니다.
다음 순서는 lsmod 명령어를 사용해서 현재 bonding module이 존재하는지 확인을 합니다.
root@ubuntu:~# lsmod | grep -i bonding
bonding               163840  0
root@ubuntu:~#
본딩 모듈이 존재한다면 위의 화면이 출력됩니다.
출력되는 값이 없다면 modprobe bonding을 입력하여 본딩 모듈을 로드하면 됩니다.
root@ubuntu:~# modprobe bonding
root@ubuntu:~# vim /etc/modules
그리고 /etc/modules에 bonding이라는 단어를 추가해 주시면 부팅 시 모듈이 등록됩니다.
여기까지 본딩을 구성하고 설정하기 위한 사전 작업이 끝났습니다.
netplan 파일 수정
이제 netplan 파일을 수정합니다. /etc/netplan/01-netcfg.yaml 네트워크 설정 파일입니다. 보통 이 파일을 수정하시지 않고 02-bonding.yaml이라는 파일을 생성하셔서 사용하는 분들도 있습니다. 어떻게 하시던 상관은 없습니다.
파일 관리는 파일을 생성하는 편이 수월하겠습니다. 이번 스토리에서는 01-netcfg.yaml 파일을 수정하는 것으로 진행하겠습니다.
# This file describes the network interfaces available on your system
# For more information, see netplan(5).
network:
  version: 2
  renderer: networkd
  ethernets:
    ens33:
      dhcp4: false
      #      addresses: [192.168.231.128/24]
      #      gateway4: 192.168.231.2
      #      nameservers:
      #              addresses: [8.8.8.8]
    ens34:
      dhcp4: false
      #      addresses: [192.168.231.129/24]
      #      gateway4: 192.168.231.2
      #      nameservers:
      #              addresses: [8.8.8.8]
  bonds:
          bond0:
                  dhcp4: true
                  interfaces: [ens33, ens34]
                  parameters:
                          mode: balance-rr
                          mii-monitor-interval: 1
bonds: 부터 추가로 작성한 설정입니다.
bonds: 의 시작 라인은 윗줄의 ethernets: 와 맞춰줍니다.
그다음은 bonds:뒤에서 엔터를 눌러서 다음 라인으로 진행하시면 됩니다. tab키는 사용하시면 안 됩니다. 라인을 맞추실 때는 스페이스바를 이용하시고 가능하면 윗줄의 설정 끝에서 엔터를 누르시면 다음 라인의 시작점이 지정됩니다. 그대로 설정을 입력하시면 됩니다.
위의 설정은 기존의 static IP를 주석 처리(#)하고 bonding IP를 dhcp로 줬습니다.
본딩 아이피가 자동으로 잡히는 설정입니다. 본딩 IP를 수동으로 사용 하 실분들은 아래와 같이 설정하시면 됩니다.
  bonds:
          bond0:
                  dhcp4: false
                  addresses: [192.168.231.133/24]
                  gateway4: 192.168.231.2
                  nameservers:
                          addresses: [8.8.8.8, 8.8.4.4]
                  interfaces: [ens33, ens34]
                  parameters:
                          mode: balance-rr
                          #                          primary: ens33
                          mii-monitor-interval: 1
dhcp를 false 나 no로 바꾸시고 기존 네트워크 설정과 같이 IP address, gateway, DNS를 입력해 주시면 됩니다. 끝줄에서 엔터로 진행하시면 저렇게 라인이 알아서 맞춰집니다. DNS는 두 개를 입력하셔도 되고, 한 개를 입력하셔도 됩니다. 구분은 , 콤마로 해주시면 됩니다.
false = no
true = yes
대체할 수 있습니다.
파라미터에서 프라이머리 슬래이브를 주석 처리한 것은 해당 모드에서 지원하지 않기 때문입니다.
추후 본딩을 사용하지 않은 실 때는 본딩 라인 전체를 주석(#) 처리해주시고 사용하시면 됩니다.
항상 저장하시고 netplan apply로 적용을 시켜주시면 됩니다.
오타가 없으시다면, 정상 적용됩니다.
root@ubuntu:~# netplan apply
root@ubuntu:~# ifconfig -a
bond0: flags=5187<UP,BROADCAST,RUNNING,MASTER,MULTICAST>  mtu 1500
        inet 192.168.231.133  netmask 255.255.255.0  broadcast 192.168.231.255
        inet6 fe80::68cd:afff:fe64:37ac  prefixlen 64  scopeid 0x20<link>
        ether 6a:cd:af:64:37:ac  txqueuelen 1000  (Ethernet)
        RX packets 1594  bytes 122217 (122.2 KB)
        RX errors 0  dropped 0  overruns 0  frame 0
        TX packets 738  bytes 79141 (79.1 KB)
        TX errors 0  dropped 0 overruns 0  carrier 0  collisions 0

ens33: flags=6211<UP,BROADCAST,RUNNING,SLAVE,MULTICAST>  mtu 1500
        ether 6a:cd:af:64:37:ac  txqueuelen 1000  (Ethernet)
        RX packets 290  bytes 18058 (18.0 KB)
        RX errors 0  dropped 0  overruns 0  frame 0
        TX packets 369  bytes 40058 (40.0 KB)
        TX errors 0  dropped 0 overruns 0  carrier 0  collisions 0

ens34: flags=6211<UP,BROADCAST,RUNNING,SLAVE,MULTICAST>  mtu 1500
        ether 6a:cd:af:64:37:ac  txqueuelen 1000  (Ethernet)
        RX packets 1304  bytes 104159 (104.1 KB)
        RX errors 0  dropped 0  overruns 0  frame 0
        TX packets 369  bytes 39083 (39.0 KB)
        TX errors 0  dropped 0 overruns 0  carrier 0  collisions 0

lo: flags=73<UP,LOOPBACK,RUNNING>  mtu 65536
        inet 127.0.0.1  netmask 255.0.0.0
        inet6 ::1  prefixlen 128  scopeid 0x10<host>
        loop  txqueuelen 1000  (Local Loopback)
        RX packets 88  bytes 6672 (6.6 KB)
        RX errors 0  dropped 0  overruns 0  frame 0
        TX packets 88  bytes 6672 (6.6 KB)
        TX errors 0  dropped 0 overruns 0  carrier 0  collisions 0

root@ubuntu:~#
bond0에 192.168.231.133 IP가 적용된 것을 확인할 수 있습니다.
netplan apply가 정상 적용됐는데 IP 설정이 반영이 안 되었다면, reboot 진행해 주시면 됩니다.
ethtool 확인
root@ubuntu:~# ethtool bond0
Settings for bond0:
Supported ports: [ ]
Supported link modes: Not reported
Supported pause frame use: No
Supports auto-negotiation: No
Supported FEC modes: Not reported
Advertised link modes: Not reported
Advertised pause frame use: No
Advertised auto-negotiation: No
Advertised FEC modes: Not reported
Speed: 2000Mb/s
Duplex: Full
Port: Other
PHYAD: 0
Transceiver: internal
Auto-negotiation: off
Link detected: yes
root@ubuntu:~#
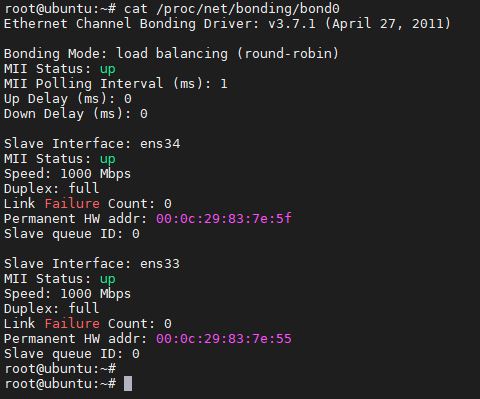
root@ubuntu:~# cat /proc/net/bonding/bond0
Ethernet Channel Bonding Driver: v3.7.1 (April 27, 2011)
Bonding Mode: load balancing (round-robin)
MII Status: up
MII Polling Interval (ms): 1
Up Delay (ms): 0
Down Delay (ms): 0
Slave Interface: ens34
MII Status: up
Speed: 1000 Mbps
Duplex: full
Link Failure Count: 0
Permanent HW addr: 00:0c:29:83:7e:5f
Slave queue ID: 0
Slave Interface: ens33
MII Status: up
Speed: 1000 Mbps
Duplex: full
Link Failure Count: 0
Permanent HW addr: 00:0c:29:83:7e:55
Slave queue ID: 0
root@ubuntu:~#ethtool bond0을 사용하여 링크 상태나 속도의 대역폭 상태를 확인할 수 있습니다.
추가로 cat /proc/net/bonding/bond0 파일을 확인하시면 본딩 정보를 확인할 수 있습니다.
bonding mode
간략하게나마 본딩 모드에 대해 설명드리겠습니다.
mode 0 = balance-rr
Round-robin이라고도 부릅니다. 송신하는 패킷마다 사용하는 LAN 포트를 변경합니다.
RR(RoundRobin) 방식 Load Balancing, 인터페이스의 라운드 로빈(active-active 대역폭 상승+Failover를 지원)
디바이스가 2개일 경우(랜 포트 두 개) 트래픽을 같이 사용할 수 있어 대역폭 분산시키는데 효과적입니다.
[A NIC -> B NIC -> A NIC -> B NIC 순]으로 패킷을 분산시키는 방법을 사용합니다.
스위치에서 지원한다면 hashing 업이 load balancing 됩니다.
mode 1 = active-backup
bond LAN port 중 한 개의 포트만 사용합니다.(하나의 슬레이브만 활성화와 같은 의미)
LAN port 이상이나 고장이 생길 경우 대체됩니다.(나머지 슬레이브는 standby 상태)
Failover전용 mode입니다.
primary를 설정하지 않으면 failback 되지 않습니다.
스위치 지원은 필요 없습니다.
mode 2 = balance-xor
mode 0과 비슷하지만, 목적지의 MAC address와 발신지의 MAC address XOR연산을 통해 사용할 LAN port 결정합니다.
XOR 방식 / 수신 시에는 MAC address로 매핑합니다.
송신 시 1번 NIC를 사용합니다.
(NIC는 Network Interface Card로 흔히 랜카드나 랜 포트를 이야기합니다.)
mode 3 = broadcast
모든 bond LAN port를 사용하여 데이터 전송합니다.(특별한 상황 외에는 사용가 빈도 극히 낮습니다.)
Failover를 지원합니다.
스위치 지원은 필요 없습니다.
mode 4 = 802.3ad(Link Aggregation), LACP
IEEE 802.3ad 프로토콜을 이용하여 Aggregation을 작성합니다.
대역폭이 상승하고 부하가 분산됩니다.
Failover를 지원합니다.
802.3ad Dynamic Link aggregation (동적 링크 집계)
switch에 aggregation group을 생성해야 합니다.
switch가 802.3ad를 지원해야 합니다.
같은 속도와 duplex 설정을 공유하는 aggregation group을 만들어야 합니다.
송/수신은 active aggregator 안에서 수행되고, 연결 대수에 상관없이 그룹화에 따라 회선의 정책이 변경되어 무단절 인터넷 연결을 가능하게 만드는 방식입니다.
mode 5 = balance-tlb(TLB)
적응형 송신 부하분산
로드밸런싱으로 송신 시 부하가 낮은 LAN port를 사용합니다.
스위치 지원은 필요 없습니다.
mode 6 = balance-alb(ALB)
mode 4를 스위치가 지원하지 않을 때의 대안입니다.
적응형 부하분산
mode 5와 비슷합니다.
송수신시 부하가 낮은 NIC를 사용합니다.
스위치 지원은 필요 없습니다.
거의 대부분 0 또는 1 mode를 사용합니다.
추가로 bond 설정에 있는 mii monitor interval에 대한 설명입니다.
miimon = LAN port의 정상작동 확인 옵션(링크 모니터링), 밀리세컨드 단위, 기본값=0, 0=Failover를 비활성화합니다.
'Linux Engineer' 카테고리의 다른 글
| apt-get 과 apt 차이점 (0) | 2020.11.20 |
|---|---|
| 리눅스 top 명령어 (0) | 2020.11.19 |
| 우분투 멀티 IP - 다중 IP 설정 (0) | 2020.11.17 |
| 우분투 아나콘다 설치 - 삭제 anaconda install (0) | 2020.11.16 |
| 우분투 파이썬 버전 변경 - alternatives (0) | 2020.11.15 |


